Sign and encrypt emails using OpenPGP
Privacy of correspondence and data security are among the main goals that the email client The Bat! successfully achieves. The Bat! helps to protect the privacy of your business and personal correspondence by employing OpenPGP and S/MIME to sign or encrypt emails. In this article we will remind you of how to use OpenPGP to sign and encrypt emails.
First of all you should download, install and set up the preferred OpenPGP program. For example, you can install and use GnuPG: https://www.gpg4win.org/
To be able to encrypt and sign messages, you need to generate a key pair that consists of a public key and a private key. The public key should be given to your correspondents, while the private key should be kept absolutely secret.
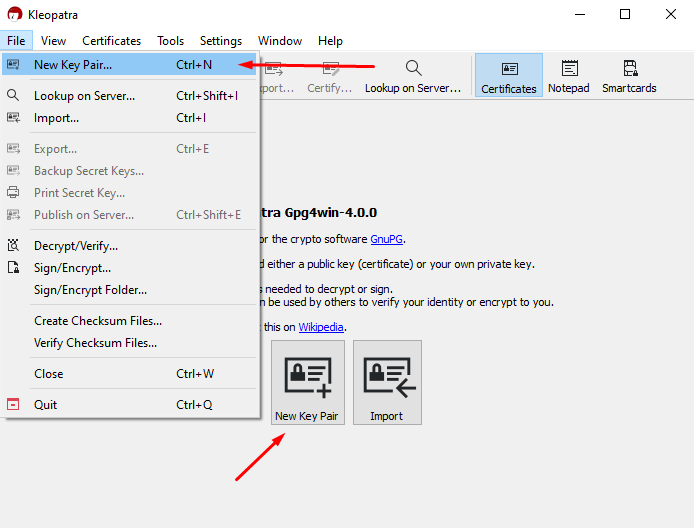
To generate a key pair, access the Options -> OpenPGP -> OpenPGP Key Manager menu. If you have installed GnuPG, then Kleopatra Key Manager will be opened in this case. Press the New Key Pair icon or choose New Key Pair item in the File menu to generate a key pair.
Follow the instructions of the Key Generation Wizard to generate the key pair. You will need to enter the name and the email address that will correspond to the key pair. Check the Protect the generated key with a passphrase box to protect your private key by a password. To decrypt the encrypted messages you will need to input this passphrase.

To export your public key, select your key pair and press the Export icon or access the File -> Export menu (Ctrl+E). Specify the name of the file, in which your public key will be stored. Do not export your private key. Send the file with the public key to your correspondents – they will encrypt messages to you using your public key. You can decrypt such encrypted messages using your private key. You can send your public key as an attachment or directly in the text of the email.
To import public keys of your correspondents use the File -> Import menu (Ctrl+I). Use the public keys of your correspondents to encrypt messages to them.
Encrypting Messages
Using encryption you can ensure the privacy of your correspondence. Only those people to whose public keys the message is encrypted to, are able to read it.
Manually Encrypting Messages
Method 1
Select the "Enable OpenPGP" option in the Privacy menu in the Message Editor. Then enable the "Encrypt when Completed" option in the Privacy menu or click the  icon on the Security toolbar. You will be able to continue editing the message as it will be encrypted directly before you send it.
Method 2
Select the "Enable OpenPGP" option in the Privacy menu and choose one of the options – "Encrypt Entire Text" or "Sign & Encrypt Entire Text" in the Privacy -> OpenPGP menu. If you choose the second option, the message will be signed as well.
Automatically Encrypting Messages
You can set automatic encryption as well: Enable the "Encrypt when Completed" and "Enable OpenPGP" options in the Account -> Properties -> Options menu.
Tip: You can use the %ENCRYPTCOMPLETE macro in the templates – in this case messages will be automatically encrypted before sending.
Decrypting Messages
To decrypt a message, select it and choose the "Decrypt" option in the Tools -> Privacy menu (Shift+Ctrl+D).
The decrypted message is not stored in the message base to protect your privacy. Every time you want to read an encrypted message you have to decrypt it again. You can decrypt and save message if needed by selecting the respective option in the Tools -> Privacy menu (Shift+Ctrl+G).
Note: The Bat! automatically checks the signature if there is one.
Electronic Signature
The electronic signature allows checking the authenticity of the sender. It ensures that any attempt to manipulate messages between you and the recipient is easily detected.
Manually Signing Messages
Method 1
Select the "Enable OpenPGP" option in the Privacy menu in the Message Editor. Then enable the "Sign when Completed" option in the Privacy menu or click the icon  on the Security toolbar.
Method 2
Select the "Enable OpenPGP" option in the Privacy menu and choose one of the options – "Sign Block" or "Sign Entire Text" in the Privacy -> OpenPGP menu.
Automatically Signing Messages
You can set up automatic signing as well: Enable the "Sign when Completed" and "Enable OpenPGP" options in the Account -> Properties -> Options menu.
Tip: Use the %SIGNCOMPLETE macro in the templates to enable automatic message signing.
Verifying Signatures
A yellow checkmark appears on the message flag if the message is signed  . To verify the signature, select the message and use the Tools -> Privacy -> Verify Signature menu (Shift+Ctrl+C) or click the icon
  on the right-hand side of the headers pane.
We have updated the information on how to encrypt and sign messages using OpenPGP in The Bat!, please see the article in the Help section on our website: https://www.ritlabs.com/en/support/help/75/#6660