| General |
|---|
|
Using the Options -> Preferences menu you can configure the main program features. 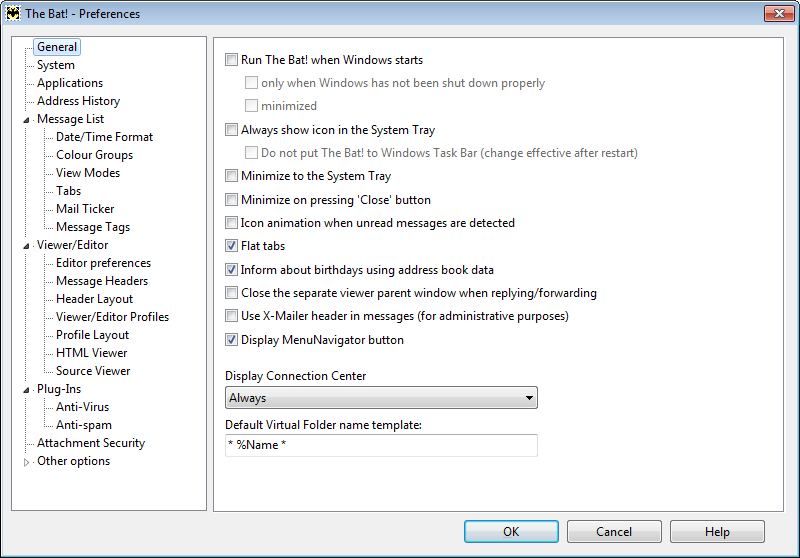
In the General section the following options are available: Run The Bat! when Windows starts – If this option is active The Bat! will start when the operating system starts. If you want to automatically run The Bat! and minimize it, check the minimized box. If you check the "only when Windows has not been shut down properly" box, The Bat! automatically loads upon the next Windows start after a system crash. Always show icon in the System Tray – If you check this box, The Bat!’s icon will be displayed in the System Tray and will alert you of new mail with a flapping bat. If you enable the "Do not put The Bat! to Windows Task Bar" option, The Bat! will automatically be minimized to the System Tray. Minimize on pressing ‘Close’ button – The Bat! will not be closed but minimized if you press the "Close" button at the upper right corner of the main window. Enable the "Icon animation when unread messages are detected" option to let the Task Bar icon notify you about unread messages. "Flat tabs" are used by default. If you disable this option, message list tabs and folder tabs will be displayed differently. If the "Inform about birthdays using address book data" option is active, The Bat! will suggest you to send an email to your correspondent if he or she has birthday on this day. Note: You need to have birthday dates set for your address book entries to let The Bat! notify you. Select the "Close the separate viewer parent window when replying/forwarding" option if you want to close the separate window after you reply to or forward the message you have viewed. Use X-Mailer header in messages (for administrative purposes) - If you turn on this header The Bat! will include the X-Mailer header into the message; it shows what email client produced the message. Display MenuNavigator button - The Bat! can display Menu Navigator in the main window of the program. To find out more about this feature, read the article Menu Navigator. Display Connection Center – automatically: Connection Center appears and disappears automatically whenever you send or receive mail; always: Connection Center is shown in the Task Bar even if no send/receive command is performed; never: Connection Centre is never shown. Whenever you create a virtual folder you can include a marker to differentiate between real folders and virtual ones by editing the Default Virtual Folder name template. Add any character in front or after %NAME. Example: VF %Name results in "VF Spam" if "Spam" is the name you entered in the folder properties. |
The Bat! Help
|
Folders (6)
Sorting Office (4)
Macros (13)
Checking Mail (2)
Reading Messages (7)
The Bat! Tools (8)
Address Book (7)
Backup (4)
Program Options (9)
|
Program Options
| System |
|---|
|
In the System section you can check or change your Mail Directory. The mail folder contains general program settings, accounts and address books. 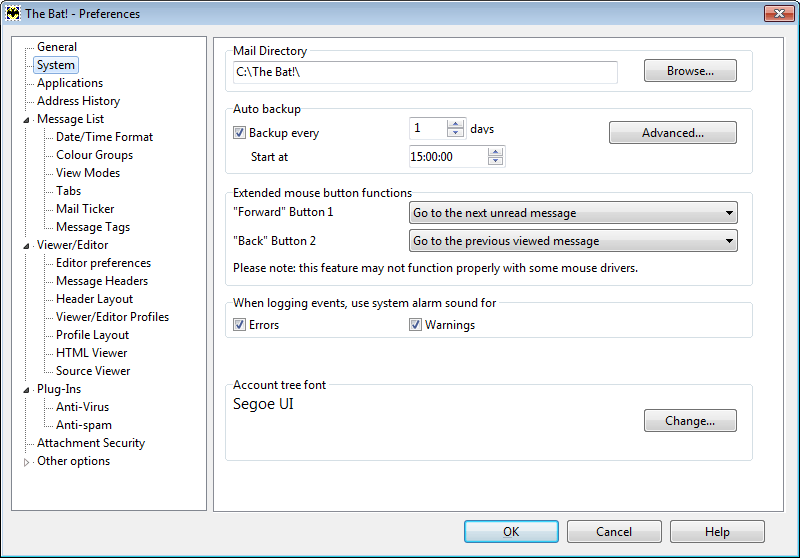
In this section you can configure the automatic backup and specify extended mouse button functions. You can choose a function for “Forward” and “Back” buttons from the dropdown menus. For example, you can make the cursor move to the next unread message when pressing the Forward button and to the previous viewed message when pressing the Back button. If you want to hear an alarm sound notification for any problems The Bat! encounters while performing its tasks (e.g. log-in failures), enable the "When logging events, use system alarm sound for" option. You can change the font used in the account and folder tree pane of the main window by clicking the "Change" button. |
| Applications |
|---|
|
In the Applications section you can set program associations: 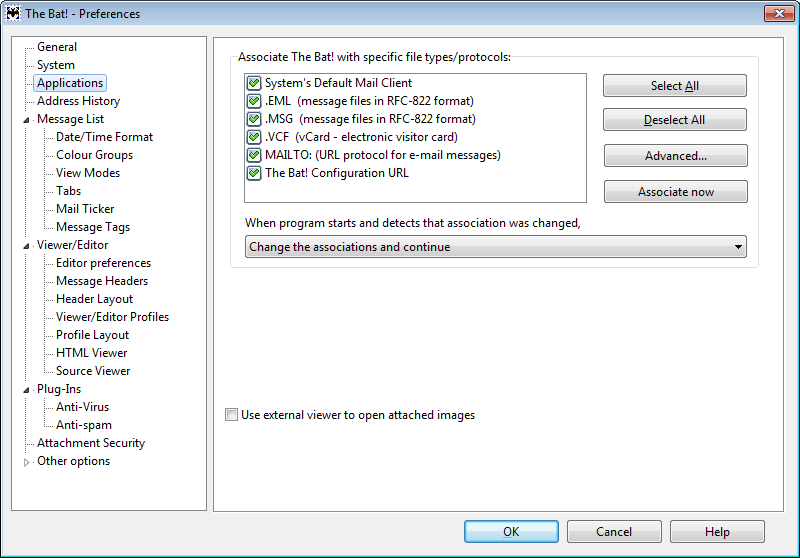
You can set The Bat! as the default Mail Client and associate the program with the following file formats: .EML, .MSG, .VCF. If you want to open The Bat! when you click an email with mailto: URL, set the respective association. To view additional associations, click the "Advanced" button. If the program detects that the associations have been changed, it will notify you about it. You can change this setting and select another option from the dropdown menu. Attached images are opened in the internal image viewer by default. If you enable the "Use external viewer to open attached images" option, you will view images in another program. In this case the default program for viewing images will be used. |
| Address History |
|---|
|
In the Address History section you can specify the settings to follow correspondence. 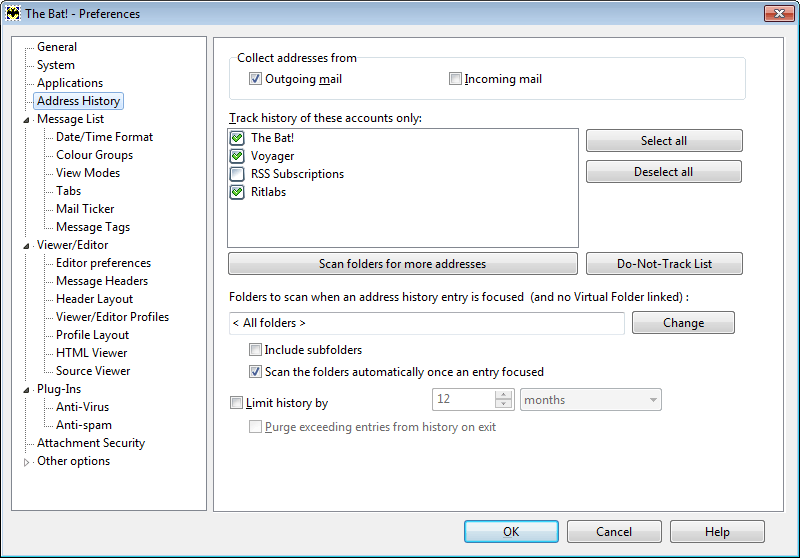
You can define the category of messages – outgoing or incoming – The Bat! will scan for addresses. Select the folders that should be checked. If you click the "Scan folders for more addresses" option, the program will scan folders and select addresses for address history. You can exclude certain folders from scanning if needed. To add addresses that should not be tracked, click the "Do-Not-Track List" button. You can add exact addresses or addresses matching certain criteria here. You can also define the folders to scan when an address history entry is focused. The program will show messages from these folders only when you select a correspondent. Enable the "Include subfolders" option, to scan subfolders as well. If you enable the "Scan the folders automatically once an entry focused" option, the message list will be updated when you select an entry. It is possible to "limit history" by several days, weeks, months or entries and "purge exceeding entries from history on exit". Some more information on the Address History you will find in our article. |
| Message List |
|---|
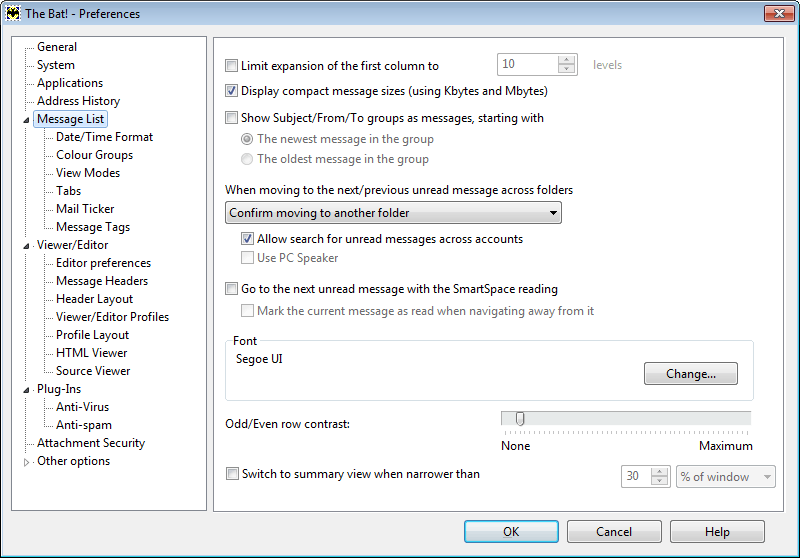
The "Limit expansion of the first column to … levels" option can be useful if you are viewing messages in threads by references with a complex structure. If this option is enabled, the messages will not be moved outside the screen when the thread is expanded, i.e. if you limit expansion of the first column, the rest columns will remain visible. If you enable the "Display compact message sizes" option, the message size will be displayed in Kbytes and Mbytes, not in bytes. If you display messages in threads by subject, sender or recipient, you can specify, which message – the newest in the group or the oldest in the group – should begin the thread. Select the action that will be performed when moving to the next/previous unread message across folders:
If you set the sound warning, you can enable the "Use PC Speaker" option to use PC speaker, otherwise the soundcard and speakers will be used. Using the spacebar key you can move from one unread message to another. This function is called SmartSpace. To enable it, check the "Go to the next unread message with the SmartSpace reading" box. If the message text does not fit to the message auto-view window, SmartSpace will first scroll the text to the end and after this move to the next unread message. Using this function you can also mark the current message as read when navigating away from it. In this section you can also change the font of the message list and configure the odd/even row contrast. To switch to summary view, enable the "Switch to summary view when narrower than …" option. Define when the summary view should be used. To find out more about this feature. read our article Summary view. Date/Time Format In the Date/Time Format subsection you can specify the format of date and time in the Received and Created columns. By default, the program uses The Bat! interface language to display date and time. You can also use "Windows Regional settings" language. You can change the message date format to long, short or custom. For example, the “d mmm yyyy” format displays 20 Jun 2015. You can hide message time by enabling the "Do not show message time" option. 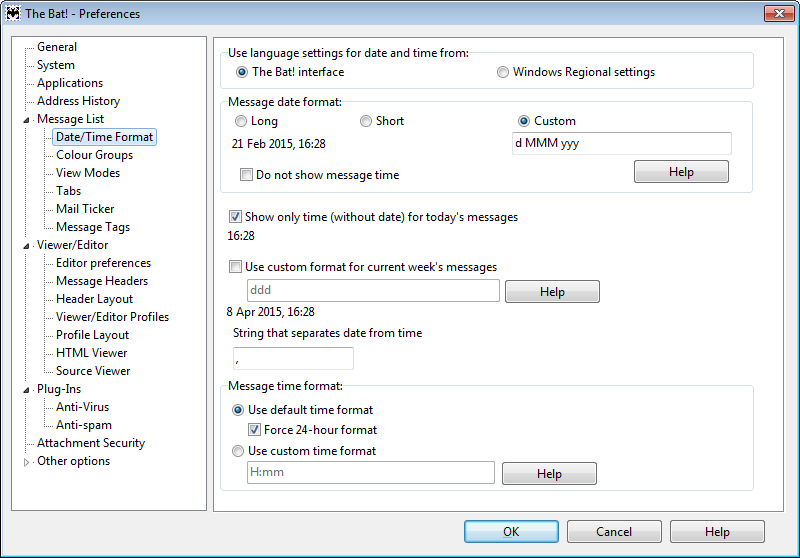
It is possible to set the format for today’s and current week’s messages. Thus you can distinguish messages that you received today from the rest. For example, if the "Show only time (without date) for today’s messages" option is active you will not see the date of today’s messages. You can also use custom format for current week’s messages. To read additional information about the format, click the "Help" button. Input a punctuation mark into the String that separates date from time field – the comma is used by default. You can also configure message time format enabling the "Use custom time format" option. If your operating system is using 12-hour format, but you want to display time in 24-hour format, check the "Force 24-hour format" option. Color Groups Color groups can be assigned to messages, folders and accounts. For more information about color groups, see the Color groups article. View Modes You can configure view modes to display messages in the message list. For more information about the view modes, see our article. Tabs Using the Options -> Preferences -> Message List -> Tabs menu you can configure message list tabs. You can create, edit or delete message list tabs. To change their order, use the "Move up" and "Move down" buttons. To find out more about tabs, see the article Message list tabs. If you use Quick Search in the message list and press the Enter key, a new message list tab displaying messages that satisfy the condition will appear. You can specify color and name template for such tabs in the Quick Search Tabs area. MailTicker™ 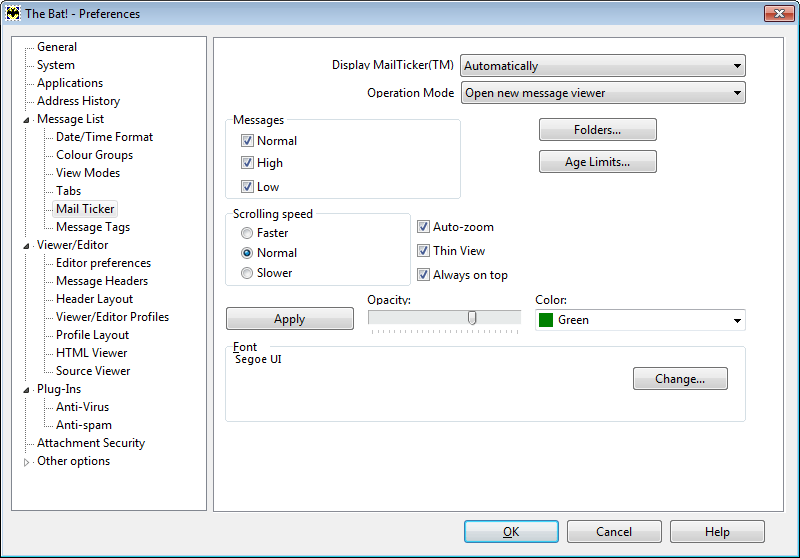
MailTicker™ is a visual indicator that displays information about unread messages. It displays the sender and the subject of the message by default. You can define, when MailTicker™ should be displayed –always, never or automatically, if unread messages are available. If you select always, The Bat! will show MailTicker™ even if there are no unread messages. Specify the action that will be performed when you double-click the MailTicker™:
You can also select "Folders" whose unread messages will be displayed on the MailTicker™. Click the "Age Limits" button to define the age of messages to display. You can set both maximum and minimum message age. You can choose" Scrolling speed" as well. "Auto-zoom" expands the MailTicker™ to the border you drag it to. If you disable the "Thin View" option, MailTicker™ will display the Recipient of the message as well. Enable the "Always on top" option to see MailTicker™ when working in other programs. You can also specify the color, opacity and font of the text on the MailTicker™. To preview the result, click "Apply". Message Tags Tags are marks that can be added to any message. Using the Options -> Preferences -> Message List -> Message Tags menu you can add, edit or delete tags. For more information, see our article on Tags. |
| Viewer/Editor |
|---|
|
Using the Options -> Preferences -> Viewer/Editor menu, you can specify the settings of the Message Editor and Viewer. 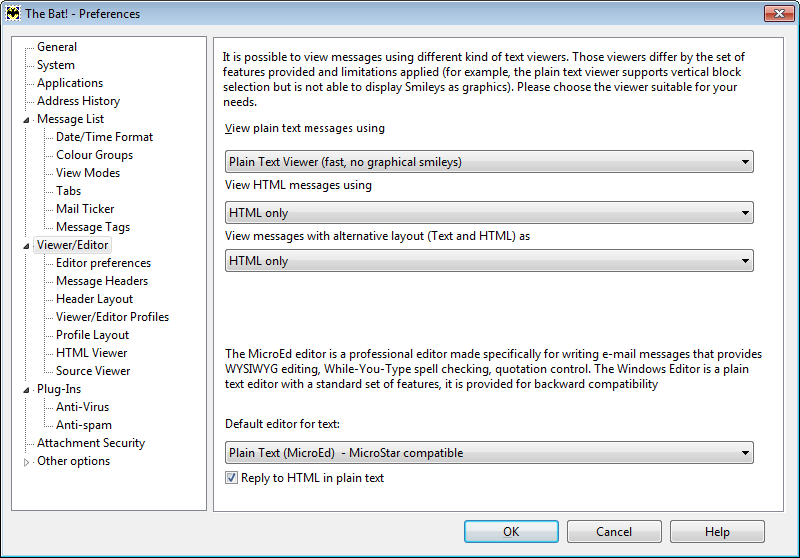
To view plain text messages you can use either the Plain Text Viewer (fast, no graphical smileys) or the Rich Text/HTML Viewer (slower, with smileys). To view HTML messages or messages with alternative layout (Text and HTML) you can use:
Using this menu, you can set the default editor for text: this can be one of the text editors – MicroEd or Windows – or HTML Editor. The HTML editor is used by default when you reply to HTML messages. If you want to use the Plain Text Editor when replying to HTML, enable the "Reply to HTML in plain text" option. Editor preferences 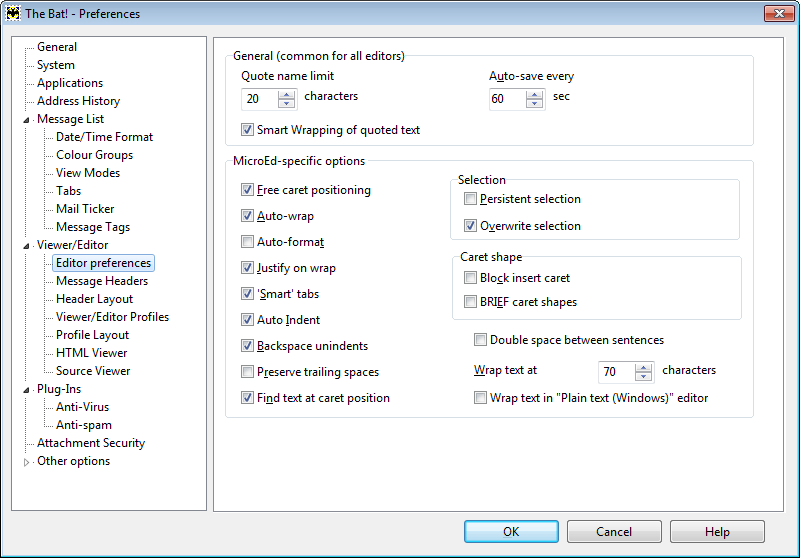
Using the Options -> Preferences -> Viewer/Editor -> Editor preferences menu, you can configure the Plain Text and HTML editors. General (common for all editors) If you use the full name for quotation prefixes, then you can limit this name by configuring the Quote name limit. This can be useful if the correspondents have longer names. If you enable the "Smart Wrapping of quoted text" option, quotations will wrap according to the specified setting. Auto-save every … sec - You can specify the time interval, after which messages will be saved as drafts. If you set 0 seconds, automatic saving will be disabled. This option can be useful when the computer is unexpectedly turned off. MicroEd-specific options If you enable the "Free caret positioning" option, you will be able to place the cursor wherever you want and start typing. If you enable "Auto-wrap", every line reaching the defined right margin gets wrapped automatically. If the "Auto-format" option is enabled, any change you make to the already entered text will reformat the paragraph. If you, for example, add an extra space it will be removed. If you intend to use it, remember that paragraphs in MicroEd are separated by empty lines meaning that you will need to press the Enter key twice to start a new paragraph. To justify lines when the text wraps, enable "Justify on wrap". If the "‘Smart’ tabs" option is active, the cursor will move to the beginning of the next word of the previous line when you press the Tab key. The "Auto Indent" option positions the cursor under the first non-blank character of the preceding non-blank line when you press Enter. If the "Backspace unindents" option is active, any indentation will be deleted when you press Backspace. To "preserve trailing spaces", enable the respective option. If the option is not enabled, any trailing spaces will be deleted once you start a new line. If the "Find text at caret position" option is active, the program will use the word at which the cursor is placed as the search condition. If both options "Auto-format" and "Double space between sentences" are active, two spaces will be inserted between the sentences separated by a period. "Wrap text at … characters" - Specify the maximum number of characters that a line should contain - each line reaching the defined right margin gets wrapped automatically. If you want to automatically wrap text in the Windows Editor as well, enable the "Wrap text in “Plain text (Windows)” editor" option. If you use "persistent selection", the selection is saved even if the cursor is moved or another text part is edited. If the "Overwrite selection" option is active, the standard Windows mode will be used – if you select a text block and enter text, the selected fragment will be overwritten. If this option is not enabled, the selected fragment will not be deleted when you enter text. If you select "Block insert caret", the caret will be displayed as a blinking rectangle. If "BRIEF caret shapes" is selected, the cursor is a blinking underscore. Message Headers Using the Options -> Preferences -> Viewer/Editor -> Message Headers menu you can add message headers or change the settings of the existing headers. 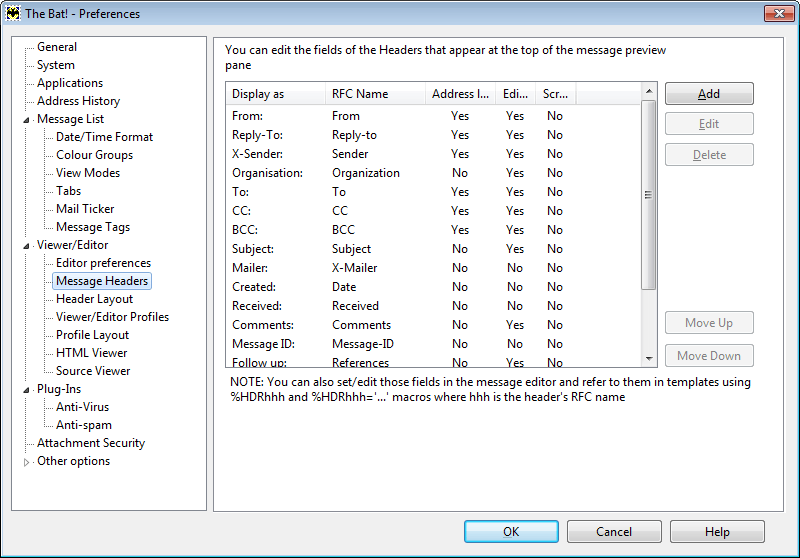
To use your own header in the templates, message editor and viewer, you should first of all add this new header. RFC recommends using the name for new headers starting with "X-". The following columns are displayed in the Message Headers table:
Note: Mandatory RFC-headers cannot be deleted. Use the "Move up" and "Move down" buttons to change the order of the message headers. When you create or edit a header, the following window appears: 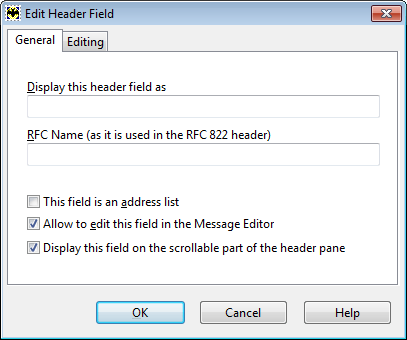
The fields in the General section correspond to the columns in the message headers table. If you enable the "This field is an address list" option, the contents of the Editing section will change. If the "Allow to edit this field in the Message Editor" option is selected, you will see the following options: 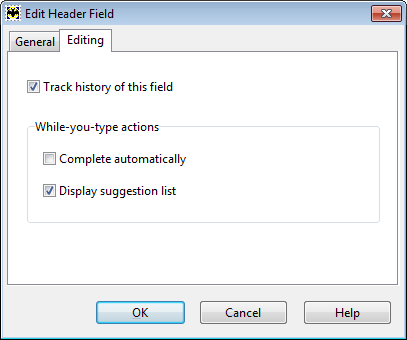
Enable "Track history of this field" to make the program remember the data you entered into this field. You can then select "while-you-type actions":
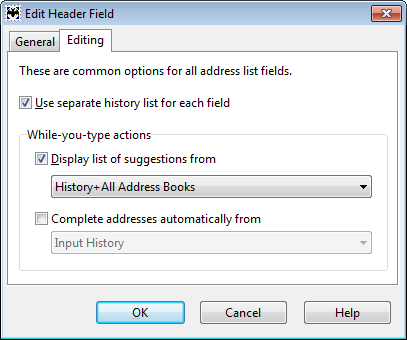
For example, you can enable "Display list of suggestions" from and select one of the options:
Header Layout In the Header Layout section, you can change the layout of the header panel. 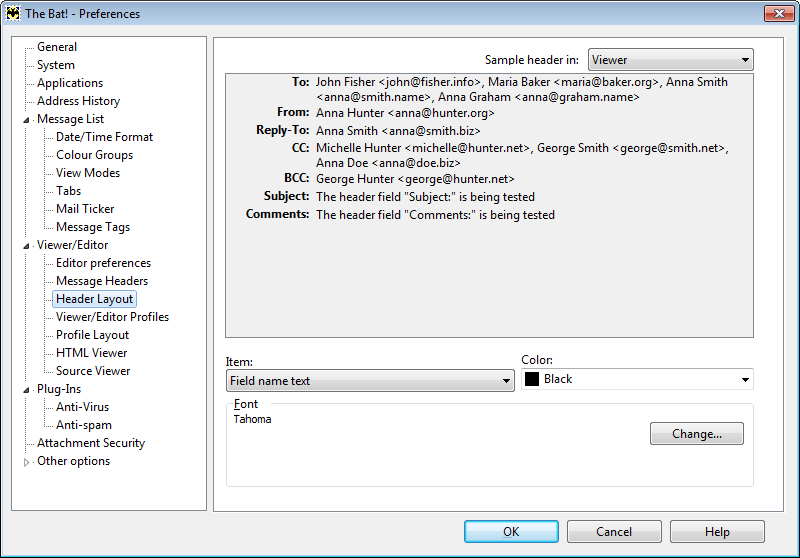
Select an item of the header that will be changed. This can be field name text or background, field value text or background, selected field text or background, hot link text, field separator, field name gradient or field value gradient. In the Color section select the color for the item. In the Sample header field select either Viewer or Editor to preview the result. You can also change the font used for headers in the Viewer and in the Editor. Viewer/Editor Profiles In the Viewer/Editor Profiles section you can manage profiles in the Editor and Viewer – you can add, edit, copy or delete them. Profiles can be applied when you view, edit or print messages. 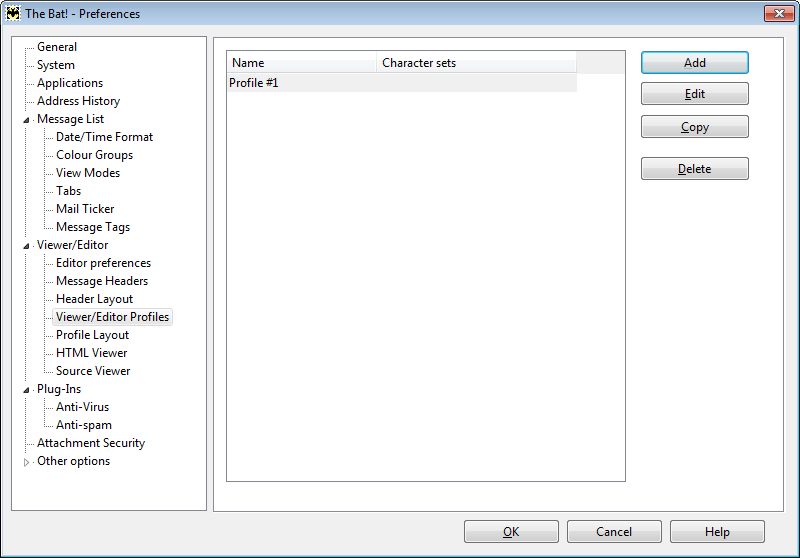
Click "Add" to create a new Profile. A new window will appear where you can select character sets – this profile will be applied for all text messages with these character sets. To edit a profile, access the Options -> Preferences -> Viewer/Editor -> Profile Layout menu. Profile Layout In this section you can edit the default profile as well as all the other profiles you created in the Viewer/ Editor Profiles section. Select the needed profile from the dropdown menu. If you need to create a new profile, click the "New" button. 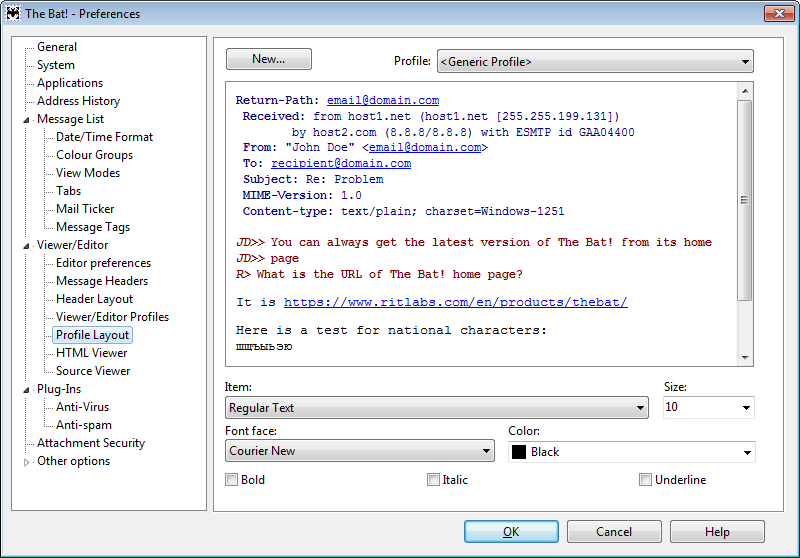
Select a text item that will be edited – it can be regular text, background, quoted text (odd or even), quotation prefix (odd or even), hyperlinks, RFC 822 headers, fixed width text, signature text, search text and search background. You can change the size, font and color of the selected item. In the preview area you will see the result. HTML Viewer Starting from The Bat! v9.2 a Chromium-based HTML viewer is used to display HTML messages. In this section you can choose between automatic and manual download of external media. 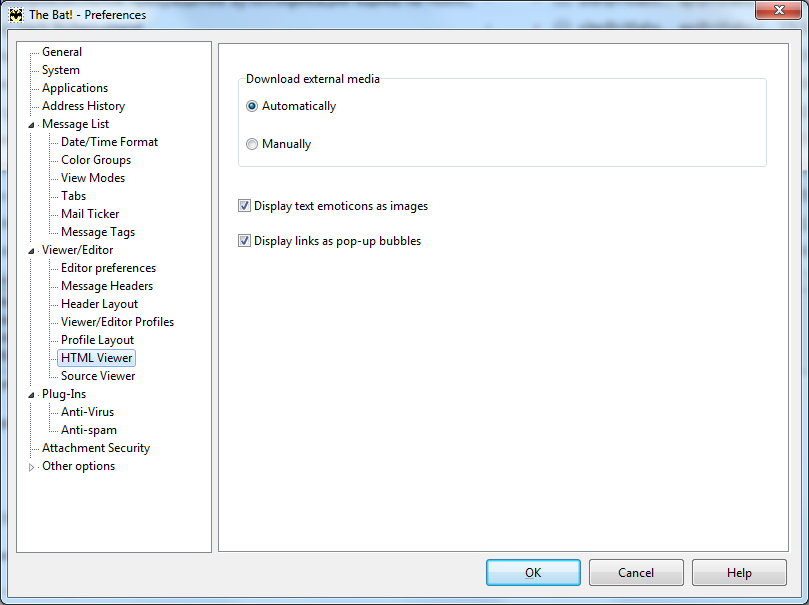
Enable the "Display text emoticons as images" option to display smileys in HTML messages. If the "Display links as pop-up bubbles" option is enabled than the URL link will appear as a hint when you hover the mouse cursor over a link in the HTML message. Source Viewer In the Source Viewer section you can select the color and the font of the message source text. In the upper part of the window you will see the preview. Select an item you would like to change and click "Change" to select its font and color. |
| Plugins |
|---|
|
The Bat! offers integration with anti-virus and anti-spam plugins developed by third parties. Install the plugin and then add it to The Bat! You can find out more about the plugins in our article on the topic. |
| Attachment Security |
|---|
|
The Bat! does not open attachments automatically. The program warns you whenever you try to open an attachment and asks if you would rather save it. Using the Options -> Preferences -> Attachment Security menu you can specify the file types to be opened without warning and those that will not be opened at all. By default, the program warns you if a file has a double extension. |
| Other Options |
|---|
|
In the Other options section you can define where the Quick Reply Pane should be displayed. You can display it in the main window, in the separate message viewer and in the Message Finder. You can also enable the "Remember the last destination of copy/move operations for each folder" option so that the program remembers the folder you moved or copied messages to last time. 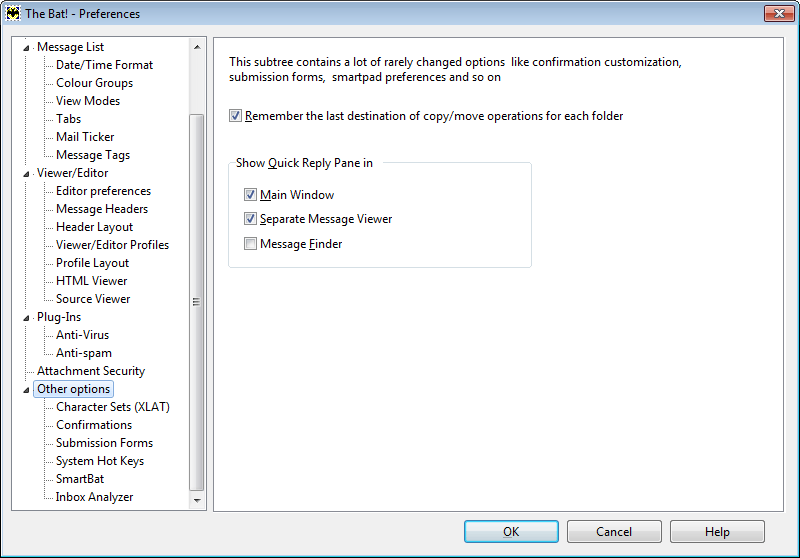 Character Sets (XLAT) Using the Options -> Preferences -> Other options -> Character Sets (XLAT) menu you can manage character sets that are available in the editor and message viewer. You can add, delete or edit character sets. Confirmations Using the Options -> Preferences -> Other options -> Confirmations menu you can specify the actions that need a confirmation. If you set a confirmation for an action, you will get a warning when you try to perform this action and you will be able to cancel it. If you do not set a confirmation, the action will be performed without warning. For example, if you enable "Check for update when The Bat! starts", the program will inform you of a new version when it is available. Submission Forms In this section you can add and delete submission forms. Submission forms are a tool for creating queries that are automatically processed. A query is actually a message with strictly defined fields and string variables. The queries come from a user with form templates (files with a TBC-extension). Such user is referred to as the client. The program that processes user requests is known as the server. In order to provide a proper transaction, the format of query fields must be equal on both client and server parts. As the server usually works with more than one client, the form templates (TBC-files) are usually created on the server and then signed and sent to the clients before starting any transactions between the client and the server. System Hot Keys Certain functions in The Bat! can be assigned to Hot Keys, which are available system wide, even if you are working in another program. For example you can assign a hot key for the "Invoke SmartBat" action and open this text editor to make notes when needed. SmartBat In the SmartBat section, you can configure SmartBat and Scheduler. 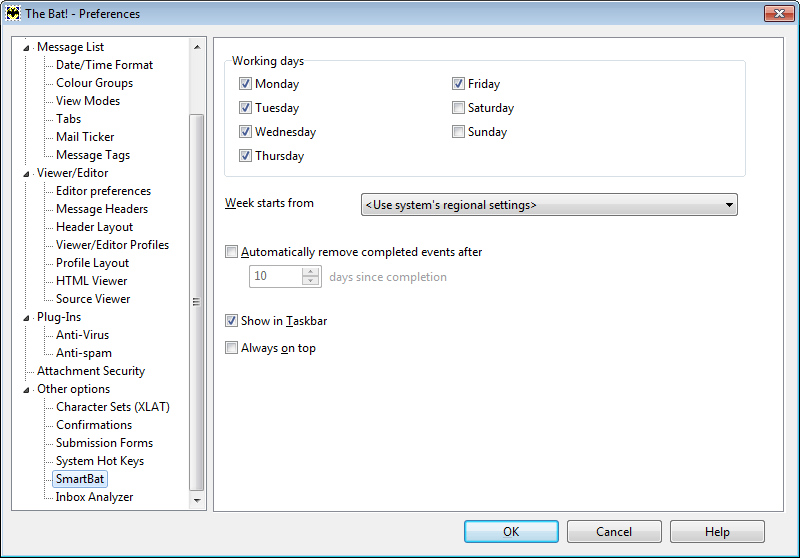 Define the days to be considered as "working days" and specify the day the week starts from. Enable the "Automatically remove completed events after …" option and set the number of days to delete events in the Scheduler that have already been executed. You can show SmartBat in Taskbar and display it always on top if desired. Inbox Analyzer In the Inbox Analyzer section you can change its settings. You can specify the folders into which the analyzed messages will be moved, select accounts to be scanned, schedule the Inbox Analyzer and edit the ignore list. For more information on the features of this important tool, see the article Inbox Analyzer. |