| Message Format |
|---|
|
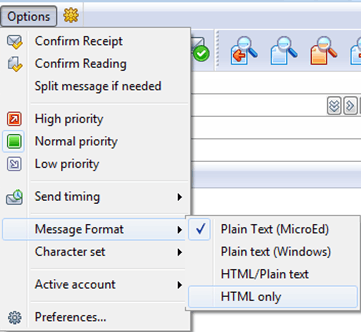
The Bat! offers the possibility to create plain text and HTML messages or combine both these formats. Using templates, macros or sorting filters, you can automatically create messages or their parts. Plain text messages can be created in the internal editor MicroEd. No issues will occur when reading such messages in an email program or web-based mail service. This editor offers basic editing features. The caret position can be free, so it is easy to type indented paragraphs or insert tables. An alternative to the MicroEd editor is Windows Plain Text editor. The main differences between these two editors are quoting and text alignment. If you intend to create a message applying different fonts and inserting pictures, tables or other objects, use the HTML or HTML with alternative plain text part editor. The format bar is available only in these two editors. If you create a message using the HTML with alternative plain text part editor, your message contains two parts – HTML and text. This can be useful if the email client of your recipient cannot handle HTML. The MicroEd editor is used by default in The Bat! To change the editor, access the Options -> Preferences -> Viewer/Editor menu and select an editor from the dropdown menu Default editor for text: 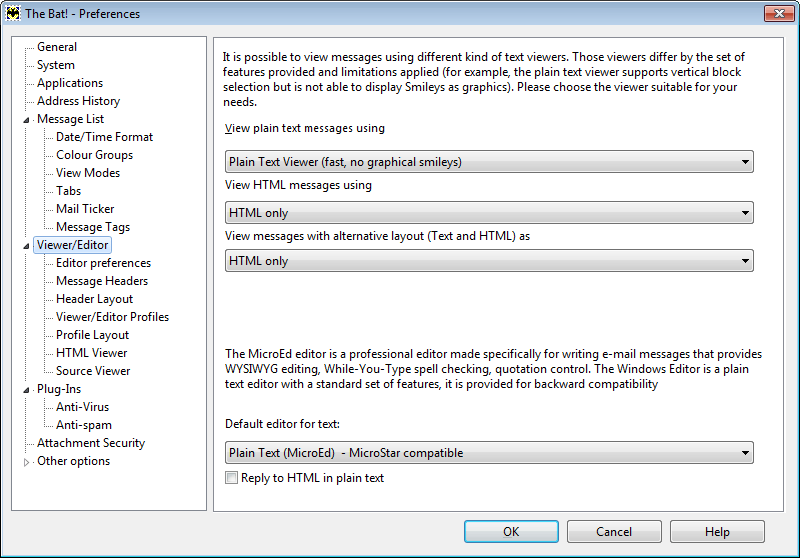

If your default editor is MicroEd, but the "Reply to HTML in plain text" option is not enabled, The Bat! will use the HTML editor when replying to HTML messages. To always use a plain text editor, enable this option. Using the same menu (see the upper part of the dialog) you can define the way your incoming and outgoing messages of different formats should be displayed.
|
The Bat! Help
|
Folders (6)
Sorting Office (4)
Macros (13)
Checking Mail (2)
Reading Messages (7)
The Bat! Tools (8)
Address Book (7)
Backup (4)
Program Options (9)
|
Creating Messages
| Composing Messages (Plain Text) |
|---|
|
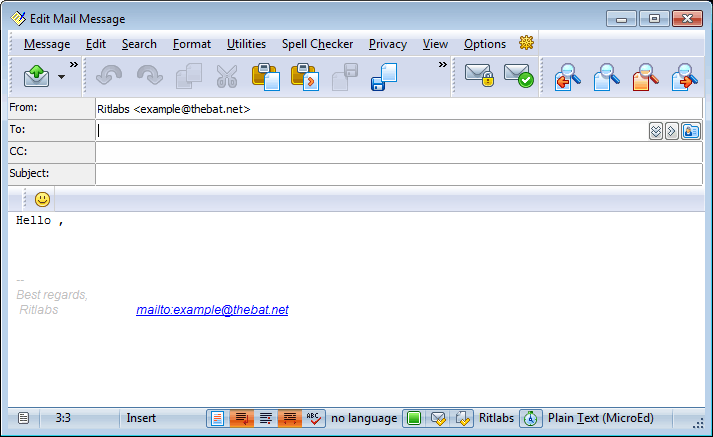
MicroEd editor offers a number of useful features for making the process of message creation easier. They are available in the menus, as well as in the upper and lower panes in the Editor window.
Upper Pane
The second upper toolbar is the Edit toolbar. Using the icons on this toolbar you can undo or redo actions, cut or copy text to clipboard, copy text to a file, paste from clipboard or from a file (as plain text or quotation), and attach a file. If you paste text as quotation, quotation prefix appears at the beginning of each line, just as when replying to a message. The same options are available in the Edit menu. The Attach a file option can be found in the Utilities menu. The Security toolbar includes the "Encrypt when completed" and "Sign when completed" icons. These options are available in the Privacy menu as well. Using the icons on the Search toolbar you can search the text, search and replace the text, and find next/previous match. The same options can be found in the Search menu. Lower Pane
The sign The numbers 3:1 indicate caret position. In our example the caret is placed in the third line at the first character. The Insert sign signifies that the copied text is inserted at the current cursor position not overwriting other characters. If you press the Insert key or click this sign, you will see the Overwrite sign meaning that the pasted text will replace the text that is present in this location. Text formatting
Menu
|
| Composing Messages (HTML) |
|---|
|
The HTML format offers more possibilities to edit text and handle pictures and tables. To set the HTML format, choose either HTML only or HTML/ Plain text under Options -> Message Format. Once you set this format, the new toolbar Formatting appears.
Using the Style menu, you can choose one of the four default text styles. Normal style uses the Courier New size 9 font. Heading styles use the Arial size 16, 14 and 13 fonts. You can change the font and its size, if desired; The Bat! supports all Windows fonts. It is possible to apply different fonts to different text fragments. If your recipient uses another operating system, some Windows fonts may not be displayed correctly, so you can make use of fonts available in all the systems, like Arial, Courier New, Times New Roman.
To edit HTML text, you can also use the options in the Format and Utilities menus. Thus, if you need to edit table properties, like fill color, cells width and height, cell spacing, access the Format -> Table properties menu. |
| Addressing Messages |
|---|
|
When you open the message editor window to create a new message, your cursor is automatically placed in the To field. To input the addressee, use one of the following methods:
These methods can be applied to the To, CC and BCC fields.
|
| Sending and Saving Message |
|---|
|
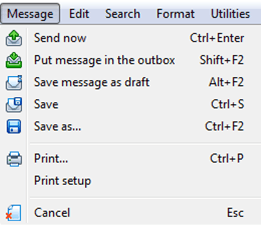
After you finish editing the message you can either send it immediately or put it in the Outbox folder. You can save message as a draft if you need to stop the editing process for some time. Moreover, you can save messages while you create them to avoid losing edits in the event of system failures. These actions are available in the Message menu as well as on the Standard toolbar.
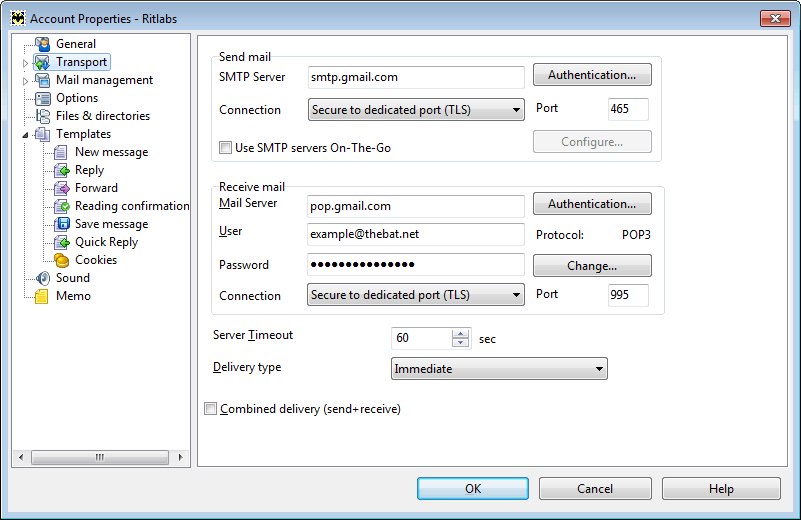
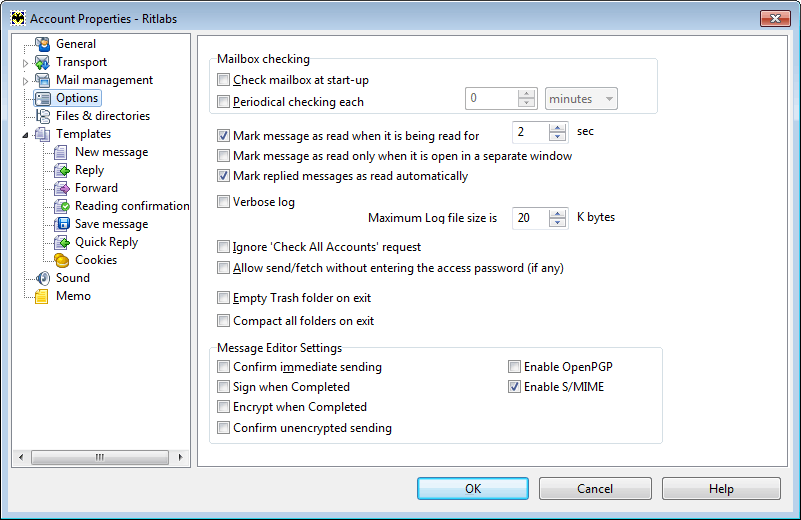
To send a message immediately, click the Send the message icon. If you click the arrow to the right of the button you can specify the time to postpone sending. To queue this message, use the second icon. The program will put it in the Outbox folder. To send messages from Outbox, use the icon Send queued mail (Shift+F2) If you want to receive and send messages simultaneously, you can enable the "Combined delivery (send+receive)" option in the Transport section of the account properties. The Bat! can also check your account for new messages periodically and at program startup. See the Options section.
 . in the Editor window. This message will be parked and put in Outbox. You will not be able to delete it without confirmation, and The Bat! will not try to send it. You can continue editing it afterwards. . in the Editor window. This message will be parked and put in Outbox. You will not be able to delete it without confirmation, and The Bat! will not try to send it. You can continue editing it afterwards.
If you want to save a message while composing it, use the icon  . It will get parked and saved in Outbox, but you will be able to continue editing it. In the event of system failure, you will not lose time composing the message again, as its copy will be saved in Outbox. . It will get parked and saved in Outbox, but you will be able to continue editing it. In the event of system failure, you will not lose time composing the message again, as its copy will be saved in Outbox.
|
| Postponed Sending |
|---|
|
Sometimes, you might send messages to the wrong recipients or forget to attach files. Once a message is sent you cannot recall it, and you have to compose new messages to correct your mistakes.
|
| Spell Checker |
|---|
To avoid typos and misspellings when composing messages, make use of the spell checker. Using the Spell Checker menu in the Editor, choose one of the actions:

You can select several languages at once; The Bat! will check the spelling using their respective dictionaries. To specify spell checker settings, use the Spell Checker -> Options menu. To edit user dictionaries, access the Spell Checker -> Dictionaries menu. Select the current user dictionaries in the dropdown menu of the File field and add or delete words using the respective buttons. The words you added can be exported in a file. You can also import words from a text file: click the Import button, point to the text file and define the words to be added. 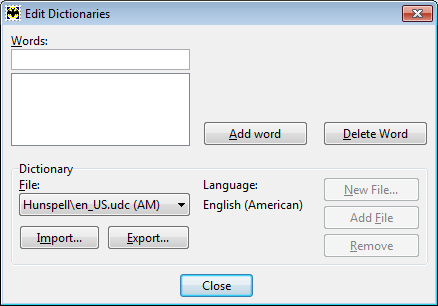
Words that are missing in the dictionaries are underlined in red. To select an action, right-click the word. Each word underlined in red can be corrected, ignored or added to the dictionary. To correct a misspelled word, right-click it, select the "Suggest more" option, and enter the correct form in the Change to field. You can add this word to the user dictionary by clicking the "Add" button. If you select the "Ignore" option, The Bat! will disregard this word for this message. If you Add the word to dictionary, The Bat! will recognize it in future emails and will no longer treat it as misspelled. Note: To specify the user dictionary, use the Spell Checker -> Dictionaries menu. When checking the entire text or the text from the cursor position, the "Spell checking" dialog box appears: 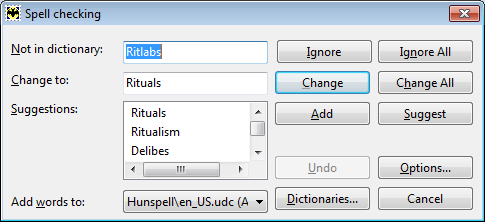
Words that are not found in the dictionaries can be changed, ignored or added to the user dictionary. After the spell checking is finished, you will get the results with the total number or checked and corrected words. |
| Character Sets |
|---|
|
Character sets are used to encode and decode various special characters that are not defined in US-ASCII.
If a wrong encoding is used when you open an email, you will not able to read it. If you use a non-standard character set when composing the message, the recipient might not be able to decode and read it. If you compose an email containing both Cyrillic and Latin characters, you can use the Unicode (UTF-8) character set. In this case, the recipients will not face any difficulties reading your email. To select a character set, use the Options -> Character set menu or click the respective area in the lower pane: |
| Attachments |
|---|
|
There are four ways to add an attachment to the message:
Method 1 Use the icon MIME-coded Method 2 Use the Utilities -> Add a file menu in the Editor window (Alt+PageUp) . Method 3 You can add files to the message by Dragging-and-Dropping them in the Editor window. Note: To insert an image into the message body, set the HTML format using the Options -> Message Format menu and drag the image into the editor window. You can add an image to the attachment pane as well: drag it to the Editor window and drop it over the headers pane – the image will be displayed on the attachment pane like the other attached files. Method 4 If The Bat! is set as MAPI handler in your operating system, you can attach a file by right-clicking it and choosing Send to -> The Bat! from the menu. |
 means that no changes were made to the message since the editor window was opened. Once you make a change, this sign changes to the red one
  .
.  - block type - In the MicroEd editor, you can define the mode of selecting text parts: stream (default block mode, selecting continuous text); linear (selecting complete text lines); column (selecting vertical text columns). The last mode can be useful when editing tables. To change the block type either click this sign or use the Edit -> Block type menu or right-click the message and select "Block type".
 - automatic wrapping - You can define the maximum length of the line in the editor (70 characters by default). When typing the message, the text will automatically wrap to a new line if this option is enabled. To change the maximum length, set another value for "Wrap text at … characters" setting under Options -> Preferences -> Viewer/Editor -> Editor preferences.
 - automatic formatting - If this option is enabled, any changes you make to the already entered text will reformat the paragraph. This option is disabled by default as it might not be useful for most users. If you intend to use it, remember that paragraphs in MicroEd are separated by empty lines meaning that you will need to press the Enter key two times to start a new paragraph. This means it is impossible to type a list with automatic formatting enabled.
 - justify on automatic format - If you enable this option, the paragraph will be block-aligned after wrapping.
 - automatic spell checking - To avoid misspelling and typos, you can enable automatic spell checking. In addition to automatic spell checking, you can make use of "Check entire text" (F4), "Check from cursor" (Shift+F4) and "Check before send/queue" options, see the Spell checker menu.
 - spell checker dictionaries - Click this field to choose the languages used for spell checking. You can select several languages and The Bat! will check all the dictionaries you have specified.
 - priority - Clicking this icon you can set the priority for this message. By default, all messages have normal priority. You can change it to high
  or low
  .
.
 - request delivery confirmation - If this option is enabled, a delivery confirmation request will be sent with your message. When your message reaches the recipient, you will get a notification (this feature must be supported by the recipient’s mail server). Remember that delivery and reading confirmations differ: if you need to be sure that your recipient has read the message, send messages with the reading confirmation request
  . Beware that the recipient might ignore your reading confirmation request.
 - active account - Click on this field to change the account that you use for sending the message.
 -
-  - Message format (plain text or HTML).
 - character set - Character sets are used for correct handling of national letters and symbols. If you compose an email using a non-standard or improper encoding, the recipient will not be able to read it. You can set an appropriate character set if you create a message in a different language.
 - privacy and security options. You can select how your email should be encrypted – using S/MIME or OpenPGP. The message will not be encrypted unless you click the Encrypt when completed icon
  and will not be signed until you click the Sign when completed icon
  . The signs
  and
and  indicate whether the message is encrypted/signed or not.
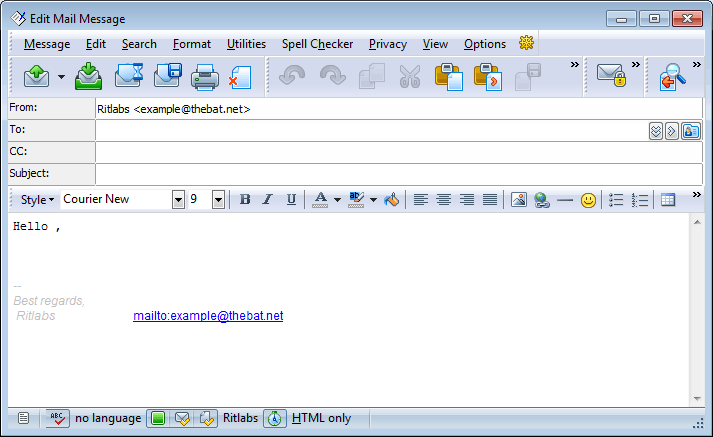
 - Using these buttons you can change the text to bold (Ctrl+B), italics (Ctrl+I) or underlined (Ctrl+U).
 - To change colors, use these buttons: the first one stands for text color, the second - for the text background color, the third - for the document background color. As document background, you can also use any background picture stored on your computer.
  - Using these buttons you can specify text alignment. The editor aligns text to the left by default; you can also align text to the right, center text or justify text aligning it to both the left and right margins.
  - insert picture - Click this icon to insert a picture stored on your computer. After you insert it, you can adjust its size.
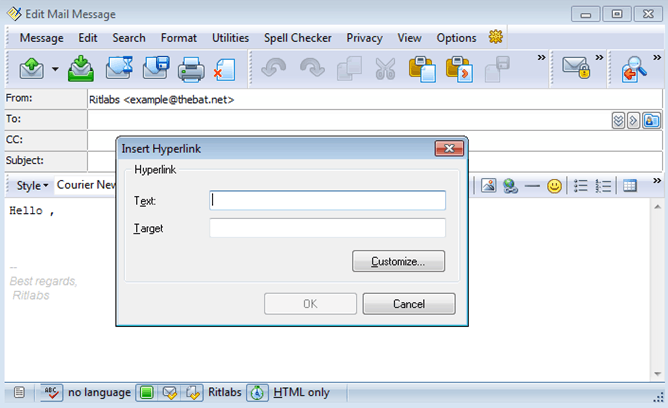
 - add a hyperlink - Using this icon you can add a hyperlink to a website. Once you click it, a new dialog box appears: enter the heading into the Text field and the URL into the Target field. If you select a text fragment and click this icon, this fragment will be used as hyperlink heading.
 - insert horizontal break - Use the horizontal break to separate parts of a message.
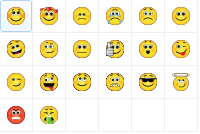
 - insert smiley - The Bat! offers its own smiley set.
 - Using these icons you can insert bullets or lists.
 - use these buttons to edit tables. If there is no table, only the first button "Insert table" is active. If you click it you will see a new dialog box where you can specify the number of columns and rows as well as table layout. Using the other icons you will be able to delete column or row, insert column on the left or on the right, insert row above or below, and merge cell
  and choose the needed address from the dropdown list. This list shows the most recently used addresses.
  to the right of the To field. A new dialog box appears. On the left-hand pane you will see the list of address book contacts, on the right-hand pane – the list of addresses that you input into the respective fields (To, CC, BCC). You can select the address book and its group from the dropdown menu in the upper left corner. You can search for an address or input it manually if there is no such entry in the address book.
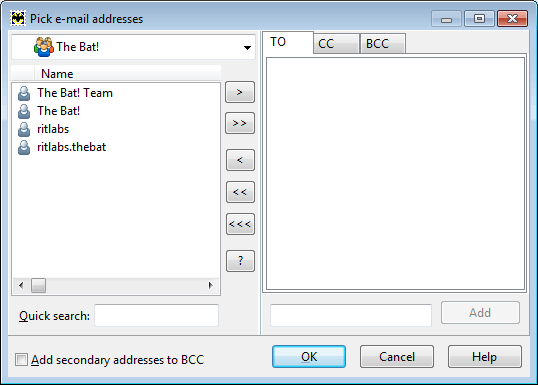
 - Adds one address
 - Adds all the addresses from the left-hand pane
 - Removes an address from the right-hand pane
 - Removes all the addresses
 - Empties all the tabs
 - Filter, search and edit options

 in the main window of the program or select the Send + Check for All option in the Tools menu (F11).
 in the lower pane